Upload File to Azure Blob Http Put
This browser is no longer supported.
Upgrade to Microsoft Edge to accept advantage of the latest features, security updates, and technical support.
![]()
- .NET
- REST
- Portal
In Media Services, y'all upload your digital files into an asset. The Asset entity tin can contain video, audio, images, thumbnail collections, text tracks and closed caption files (and the metadata about these files.) In one case the files are uploaded into the nugget, your content is stored securely in the deject for further processing and streaming.
In this tutorial, yous learn how to upload a file and other operation associated with it:
- Set upwardly Postman for all the upload operations
- Connect to Media Services
- Create an access policy with write permission
- Create an nugget
- Create a SAS locator and create the upload URL
- Upload a file to hulk storage using the upload URL
- Create a metadata in the asset for the media file you uploaded
Prerequisites
- If yous don't accept an Azure subscription, create a free account before y'all begin.
- Create an Azure Media Services account using the Azure portal.
- Review the Accessing Azure Media Services API with AAD authentication overview article.
- Also for more information Review the Use Azure Ad hallmark to access the Media Services API with REST article.
- Configure Postman as described in Configure Postman for Media Services REST API calls.
Considerations
The post-obit considerations employ when using Media Services Balance API:
- When accessing entities using Media Services REST API, you must ready specific header fields and values in your HTTP requests. For more information, run across Setup for Media Services REST API Evolution.
The Postman collection used in this tutorial takes care of setting all the necessary headers. - Media Services uses the value of the IAssetFile.Name property when building URLs for the streaming content (for instance, http://{AMSAccount}.origin.mediaservices.windows.internet/{GUID}/{IAssetFile.Name}/streamingParameters.) For this reason, percent-encoding is non allowed. The value of the Proper name property cannot have any of the post-obit percent-encoding-reserved characters: !*'();:@&=+$,/?%#[]". Also, in that location can only be i '.' for the file proper noun extension.
- The length of the name should non be greater than 260 characters.
- At that place is a limit to the maximum file size supported for processing in Media Services. See this article for details about the file size limitation.
Fix upward Postman
For steps on how to set Postman for this tutorial, see Configure Postman.
-
Add connection values to your surroundings.
Some variables that are part of the MediaServices environment demand to be set manually before yous tin can start executing operations defined in the collection.
To get values for the first five variables, see Access the Azure Media Services API with Azure Advertizing authentication.

-
Specify the value for the MediaFileName environment variable.
Specify the file name of the media you are planning to upload. In this case, we are going to upload the BigBuckBunny.mp4.
-
Examine the AzureMediaServices.postman_environment.json file. Y'all will encounter that near all operations in the collection execute a "test" script. The scripts take some values returned by the response and set appropriate surround variables.
For example, the first operation gets an access token and set up it on the AccessToken environment variable that is used in all other operations.
"mind": "test", "script": { "blazon": "text/javascript", "exec": [ "var json = JSON.parse(responseBody);", "postman.setEnvironmentVariable(\"AccessToken\", json.access_token);" ] } -
On the left of the Postman window, click on 1. Get AAD Auth token -> Get Azure Ad Token for Service Principal.
The URL portion is filled with the AzureADSTSEndpoint environment variable (earlier in the tutorial, yous gear up the values of environment variables that support the collection).

-
Press Send.
You tin can see the response that contains "access_token". The "examination" script takes this value and sets the AccessToken environment variable (as described to a higher place). If yous examine your environment variables, you will see that this variable now contains the access token (bearer token) value that is used in the residue of the operations.
If the token expires get through the "Get Azure AD Token for Service Principal" step once again.
Create an admission policy with write permission
Overview
Note
There is a limit of 1,000,000 policies for different AMS policies (for example, for Locator policy or ContentKeyAuthorizationPolicy). Yous should use the same policy ID if you are always using the same days / admission permissions, for case, policies for locators that are intended to remain in place for a long time (non-upload policies). For more information, see this article.
Before uploading whatever files into blob storage, fix the access policy rights for writing to an nugget. To do that, POST an HTTP request to the AccessPolicies entity set. Define a DurationInMinutes value upon cosmos or you receive a 500 Internal Server error bulletin back in response. For more information on AccessPolicies, encounter AccessPolicy.
Create an access policy
-
Select AccessPolicy -> Create AccessPolicy for Upload.
-
Press Send.
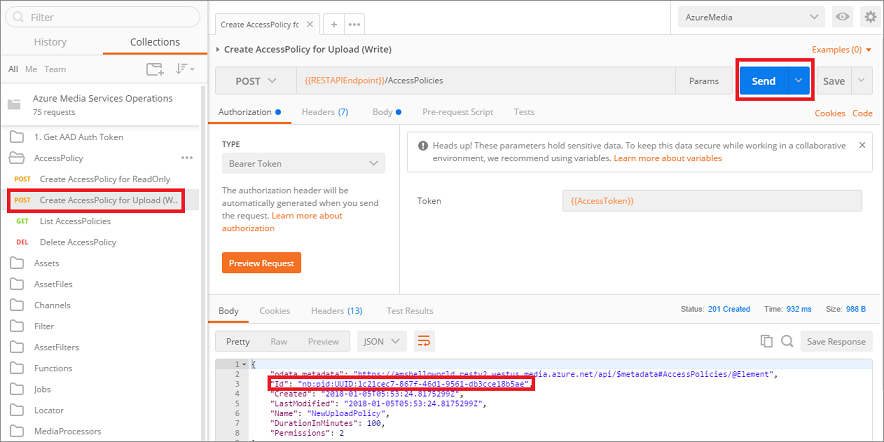
The "examination" script gets the AccessPolicy Id and sets the appropriate environment variable.
Create an asset
Overview
An asset is a container for multiple types or sets of objects in Media Services, including video, sound, images, thumbnail collections, text tracks, and airtight caption files. In the REST API, creating an Asset requires sending Postal service asking to Media Services and placing any property information about your asset in the asking body.
One of the properties that yous can add together when creating an nugget is Options. You tin specify one of the following encryption options: None (default, no encryption is used), StorageEncrypted (for content that has been pre-encrypted with client-side storage encryption), CommonEncryptionProtected, or EnvelopeEncryptionProtected. When you have an encrypted asset, yous demand to configure a delivery policy. For more than information, see Configuring asset delivery policies.
If your asset is encrypted, you must create a ContentKey and link it to your asset as described in the post-obit article: How to create a ContentKey. Afterwards you upload the files into the asset, you need to update the encryption properties on the AssetFile entity with the values you got during the Asset encryption. Practise it past using the MERGE HTTP request.
In this example, nosotros are creating an unencrypted nugget.
Create an asset
-
Select Assets -> Create Asset.
-
Press Send.

The "examination" script gets the Asset Id and sets the appropriate surround variable.
Create a SAS locator and create the Upload URL
Overview
Once you have the AccessPolicy and Locator prepare, the bodily file is uploaded to an Azure Hulk Storage container using the Azure Storage REST APIs. You must upload the files as block blobs. Page blobs are non supported past Azure Media Services.
For more information on working with Azure storage blobs, come across Hulk Service Rest API.
To receive the actual upload URL, create a SAS Locator (shown below). Locators define the start fourth dimension and type of connectedness endpoint for clients that desire to admission Files in an Asset. Yous can create multiple Locator entities for a given AccessPolicy and Asset pair to handle dissimilar customer requests and needs. Each of these Locators uses the StartTime value plus the DurationInMinutes value of the AccessPolicy to determine the length of fourth dimension a URL can be used. For more information, encounter Locator.
A SAS URL has the following format:
{https://myaccount.blob.cadre.windows.net}/{asset proper name}/{video file proper noun}?{SAS signature}
Considerations
Some considerations apply:
- You lot cannot have more than five unique Locators associated with a given Asset at i time. For more than information, see Locator.
- If y'all need to upload your files immediately, you should set your StartTime value to five minutes before the current time. This is because there may be clock skew betwixt your customer machine and Media Services. Besides, your StartTime value must be in the following DateTime format: YYYY-MM-DDTHH:mm:ssZ (for example, "2014-05-23T17:53:50Z").
- At that place may be a 30-40 second delay after a Locator is created to when information technology is available for use.
Create a SAS locator
-
Select Locator -> Create SAS Locator.
-
Press Send.
The "test" script creates the "Upload URL" based on the media file name you lot specified and SAS locator data and sets the appropriate environment variable.

Upload a file to blob storage using the upload URL
Overview
Now that y'all accept the upload URL, yous need to write some code using the Azure Blob APIs direct to upload your file to the SAS container. For more than information, run into the following articles:
- Using the Azure Storage REST API
- PUT Blob
- Upload blobs to Blob storage
Upload a file with Postman
As an example, nosotros employ Postman to upload a minor .mp4 file. There may be a file size limit on uploading binary through Postman.
The upload request is not part of the AzureMedia drove.
Create and set up a new request:
-
Press +, to create a new asking tab.
-
Select PUT functioning and paste {{UploadURL}} in the URL.
-
Leave Authority tab equally is (do not set it to the Bearer Token).
-
In the Headers tab, specify: Key: "10-ms-blob-type" and Value: "BlockBlob".
-
In the Body tab, click binary.
-
Choose the file with the proper name that you specified in the MediaFileName surround variable.
-
Press Transport.

One time the file has been uploaded, you need to create a metadata in the asset for the media file y'all uploaded into the blob storage associated with your asset.
-
Select AssetFiles -> CreateFileInfos.
-
Printing Ship.

The file should be uploaded and its metadata set up.
Validate
To validate that the file has been uploaded successfully, you might want to query the AssetFile and compare the ContentFileSize (or other details) to what you expect to see in the new nugget.
For example, the following Get functioning brings file data for your nugget file (in or instance, the BigBuckBunny.mp4 file). The query is using the surroundings variables that y'all set earlier.
{{RESTAPIEndpoint}}/Assets('{{LastAssetId}}')/Files
Response will contain size, name, and other information.
"Id": "nb:cid:UUID:69e72ede-2886-4f2a-8d36-80a59da09913", "Name": "BigBuckBunny.mp4", "ContentFileSize": "3186542", "ParentAssetId": "nb:cid:UUID:0b8f3b04-72fb-4f38-8e7b-d7dd78888938", crawfordhinfife1965.blogspot.com
Source: https://docs.microsoft.com/en-us/azure/media-services/previous/media-services-rest-upload-files
0 Response to "Upload File to Azure Blob Http Put"
Postar um comentário